



Radon Mitigation Systems: The Complete Homeowner's Guide

Updated: Apr 22
According to the EPA's Consumer's Guide to Radon Reduction, a radon mitigation system can reduce indoor radon levels by up to 99%. We've seen it firsthand. A home in our service area tested at 75 pCi/L and dropped to 0.7 pCi/L after installation. Another went from 18.3 to less than 0.3 pCi/L.
These aren't outliers. They reflect what a properly designed system delivers, consistently, across homes of every size and foundation type.
Wisconsin's average indoor radon level sits at 5.7 pCi/L, roughly four times the national average of 1.3 pCi/L. In Dane County alone, about half of all homes test above the EPA's action level of 4 pCi/L. These are measurements, not estimates.
Radon is the leading cause of lung cancer among non-smokers, responsible for an estimated 21,000 deaths in the U.S. each year according to EPA estimates. At 4 pCi/L, the EPA calculates a lifetime lung cancer risk of 7 per 1,000 for non-smokers and 62 per 1,000 for smokers.
The World Health Organization recommends action at an even lower threshold of 2.7 pCi/L (100 Bq/m3), noting that lung cancer risk increases by 16% per 100 Bq/m3 of long-term radon exposure. Understanding radon's health effects is directly relevant to every homeowner in South Central Wisconsin, where baseline levels rank among the highest in the country.
This guide covers how radon mitigation systems work, what types fit different foundations, what installation looks like, and what it actually costs. We go beyond the basics into pressure field extension testing, component selection, and Wisconsin-specific considerations that most guides skip. Whether you're responding to an elevated test result or evaluating a home purchase, you'll have the knowledge to make a confident decision.
For Wisconsin-specific radon data, testing guidance, and local resources, our Wisconsin radon guide covers the full picture.
How a Radon Mitigation System Works
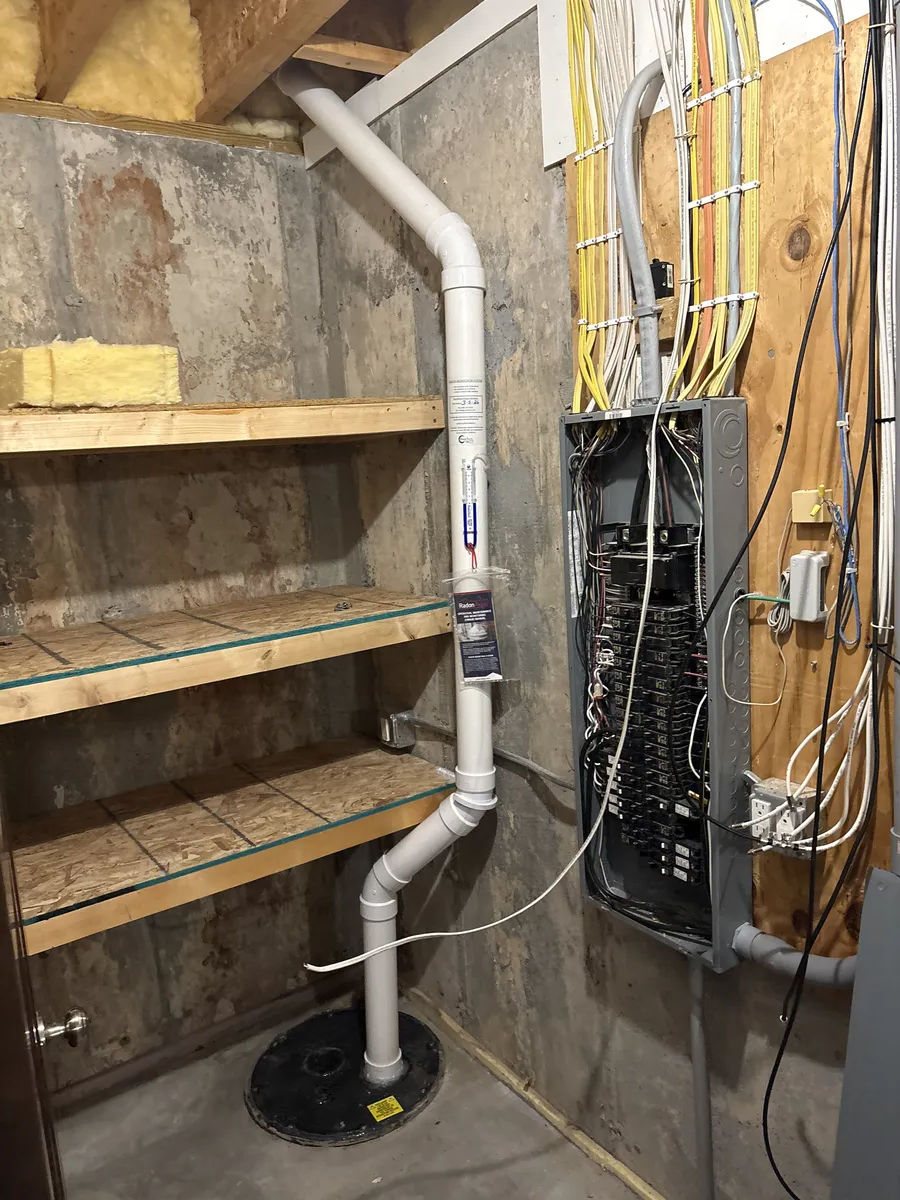
A radon mitigation system, most commonly called Active Sub-Slab Depressurization (ASD), reverses the natural pressure relationship between your home and the soil beneath it. Instead of your house pulling radon-laden soil gas in, the system pulls that gas out from under the slab before it can enter.
Indoor air pressure runs lower than the pressure of gases trapped under your foundation. This happens through the stack effect: warm air rises inside your home, creating a mild vacuum at the lowest levels. Houses naturally create 1 to 5 Pascals of negative pressure indoors relative to outdoors, according to PureTech KSU-4000 professional training data. That vacuum pulls radon through every crack, gap, and pore in your foundation.

The basic flow is straightforward. An installer excavates a suction pit, or utilizes a sump / drain tyle system, beneath the concrete slab and connects it to PVC piping that runs vertically to a fan. The fan exhausts the collected soil gas above the roofline, where it disperses harmlessly into outdoor air. Your foundation type determines the specific design approach, which the next section covers in detail.
Pressure Field Extension: The Key to Reliable Results
The science behind a successful system is Pressure Field Extension, or PFE. PFE measures how far the vacuum created by the suction point extends beneath your slab. A system only works if the vacuum reaches the entire footprint of your foundation. A system that creates vacuum in only a 10-foot radius around the pipe leaves the rest of the slab unprotected.
PFE diagnostic testing involves drilling small test holes at various points across the slab and measuring whether negative pressure reaches them while the installer applies vacuum at the suction point. According to research by Anderson (1993), this testing reduces system failure rates to less than 1%. Yet roughly 90% of installers skip it.
"PFE diagnostic testing reduces ASD system failure rates to less than 1%, yet over 90% of systems are installed without it." -- PureTech KSU-4000 Professional Training / Anderson (1993)
That gap separates engineered systems from guesswork.
Why Sealing Alone Falls Short
Some homeowners ask if they can seal the cracks and skip the system. A typical house has around 48 square inches of openings between the foundation and the living space. To stop radon entry through sealing alone, you'd need to reduce that to less than 0.2 square inches.
That's a near-impossible standard in any real-world home. Sealing cracks and gaps enhances a sub-slab depressurization system's performance, but it cannot replace one. Active depressurization works because it addresses the pressure differential, not just the entry points.
Types of Radon Mitigation Systems by Foundation
Your foundation type determines which radon mitigation system design will work. Identify your foundation below, then match it to the right approach.
Sub-Slab Depressurization (SSD)
This is the most common radon mitigation system for homes with poured concrete or slab-on-grade foundations. An installer cores a 4 to 5-inch hole through the slab and excavates a suction pit beneath it (minimum 0.25 cubic feet of material removed). PVC Schedule 40 pipe, minimum 3 inches in diameter, connects the pit to the fan and discharge point.
In tight or clay-heavy soils common across parts of South Central Wisconsin, a larger suction pit compensates for reduced air permeability. According to EPA/CLU-IN design effectiveness data, SSD typically achieves 90 to 95% radon reduction when properly designed.
Drain Tile Depressurization
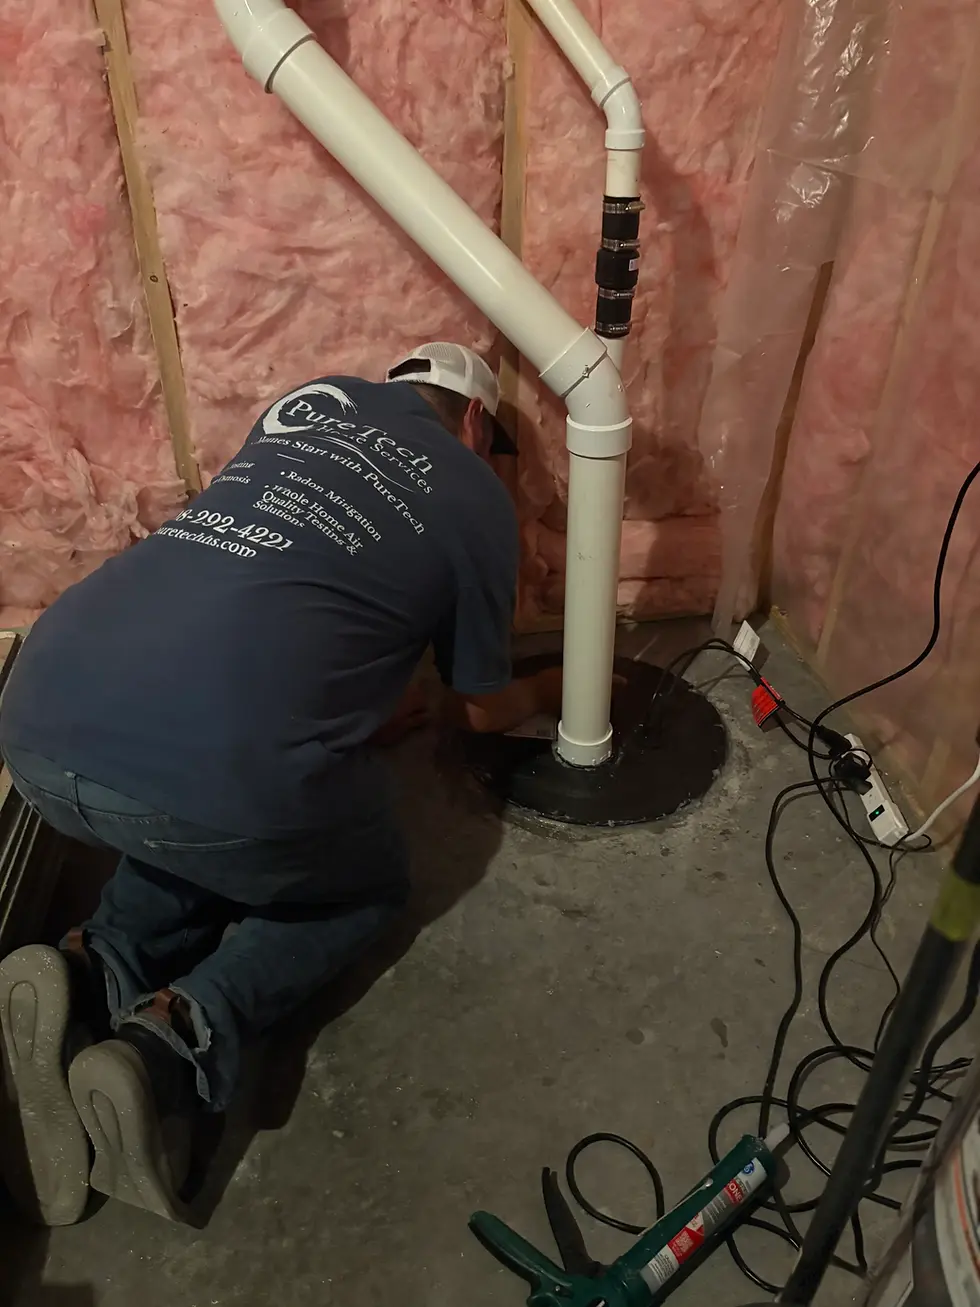
Many Wisconsin homes built after the 1970s have perimeter drain tile systems around the foundation footing. These existing drainage channels serve as excellent suction points because they naturally extend around the full perimeter of the home. This provides outstanding Pressure Field Extension with minimal additional drilling. If your home has an interior or exterior drain tile system, this approach often delivers superior results because the suction network already surrounds the foundation.
Sump Pit Depressurization
Wisconsin basements frequently include sump pits for water management. A sump pit can double
as a radon suction point when fitted with an airtight, sealed cover. The cover is critical. Without a proper seal, the system draws conditioned air from the basement instead of soil gas from beneath the slab, wasting energy and reducing effectiveness.
Sub-Membrane Depressurization (Crawlspaces)
Homes with dirt-floor crawlspaces require a different approach. A heavy-duty 6-mil polyethylene membrane seals over the entire crawl floor and up the walls, creating an airtight barrier. A suction point beneath the membrane draws soil gas out, targeting a negative pressure of 1 to 4 Pascals under the membrane. Crawlspace systems typically cost $2,500 to $5,000 due to the additional labor and materials involved.
Block Wall Suction
Older homes with hollow-core concrete block foundations can accumulate radon inside the block cavities themselves. Block wall suction draws negative pressure directly through the hollow cores, pulling radon out before it seeps through mortar joints into the living space. This approach is less common but necessary when block walls are a significant radon entry pathway.
Foundation Type Decision Guide
Poured concrete slab: Sub-Slab Depressurization | Depends on soil | Very common
Slab with drain tiles: Drain Tile Depressurization | Excellent (perimeter) | Common (post-1970s)
Basement with sump: Sump Pit Depressurization | Good (if connected to tiles) | Very common
Dirt-floor crawlspace: Sub-Membrane Depressurization | Good (under membrane) | Moderate
Hollow-core block walls: Block Wall Suction | Moderate | Older homes
Radon Mitigation System Components Explained
Knowing what each component does helps you evaluate installation quality and spot the difference between a thorough job and a shortcut.
Suction Pit
The suction pit sits beneath your concrete slab, created by coring a hole and excavating material underneath. The minimum volume is 0.25 cubic feet, but larger pits perform better, especially in tight or clay-heavy soils common in parts of South Central Wisconsin. Removing roughly 4 gallons of sub-slab material doubles the effective surface area for soil gas collection.
PVC Piping
Schedule 40 PVC pipe, minimum 3 inches in diameter, carries soil gas from the suction pit up through the home to the discharge point. When airflow exceeds 80 CFM, use 4-inch pipe. Pipe routing falls into two categories.
Interior routing runs the pipe through closets, utility rooms, or wall chases inside the home. Exterior routing exits through the foundation wall and runs up the outside. Interior routing looks cleaner and avoids freeze concerns. Exterior routing avoids taking up interior space but requires insulation in Wisconsin winters.
Radon Fan
The fan creates and maintains the negative pressure that drives the entire system. It must be installed in unconditioned space (attic, garage, or exterior). This is a code requirement, not a preference. If a fan develops a leak, you want that leak happening outside your living area.
Fan selection depends on diagnostic results:
Low-power: 14-20W | Permeable soils, straightforward layouts
Medium: 37-71W | Average conditions, most residential installs
High-flow: 86-140W | Large slabs, multiple suction points
High-suction: 60-140W | Tight soils, poor sub-slab communication
Select the fan based on diagnostic testing, not guesswork. The wrong fan wastes energy or fails to create adequate pressure.
Discharge Point
The discharge point is where soil gas exits the system. Per SGM-SF 2023 standards, it must be at least 10 feet above grade, above the roofline, and at least 10 feet from any windows, doors, or other openings. This ensures the exhausted gas disperses into the atmosphere rather than re-entering the home. For most single-family residences the exhaust should end 6" or more above the roofline.
Manometer
A U-tube manometer mounts on the pipe at eye level, typically in the basement. It provides a simple visual confirmation that the system is operating. The ideal reading falls between 0.5 and 1.75 inches of water column. A reading of zero means the fan has failed and needs attention.
Electrical
The fan requires a dedicated electrical circuit. Annual electricity costs range from $60 to $123 depending on the fan model and local utility rates. The system runs 24 hours a day, 365 days a year.
Passive vs. Active Radon Mitigation Systems
The difference between passive and active systems comes down to a single component: the fan. That one addition transforms unreliable performance into consistent protection.
The Performance Gap
Passive radon mitigation systems rely on natural convection (the tendency of warm air to rise) to move soil gas up through the pipe and out the discharge point. No fan, no electricity, no noise, no moving parts. The tradeoff is reliability.
According to PureTech KSU-4000 training data, passive systems reduce radon levels by only 12 to 59%, depending on weather conditions, wind patterns, and indoor-outdoor temperature differences. They fail to bring levels below 4 pCi/L more than 70% of the time. A home at 8 pCi/L could still measure 3.3 to 7.0 pCi/L with a passive system, potentially above the action level.
"Passive soil depressurization reduces radon by only 12 to 59%, compared to up to 99% reduction achievable by active systems." -- PureTech KSU-4000 Professional Training Materials
Active Systems Deliver Consistent Results
An active radon mitigation system uses the same infrastructure (suction pit, PVC pipe, discharge point) but adds a fan that mechanically draws soil gas out. A 2019 PMC systematic review confirmed that active sub-slab depressurization achieves more significant and sustained radon reduction than passive methods. The result is consistent performance regardless of weather, wind, or season.
We've documented reductions from 75 to 0.7 pCi/L, from 18.3 to less than 0.3 pCi/L, and from 14 to 0.08 pCi/L. A 2012 peer-reviewed study published in PubMed found that 97% of homes with active systems maintained levels below 4 pCi/L years after installation, with pre-mitigation averages of 10.3 pCi/L. Annual operating cost of $60 to $123 is minimal compared to the protection these systems provide.
Passive-to-Active Conversion

Homes built with radon-ready or passive radon pipe already have the infrastructure in place.
Converting a passive system to active means adding a fan to the existing pipe run. This costs significantly less than a full installation because there's no coring, no excavation, and no new piping.
If your home was built with a passive system, test after construction. If levels exceed 4 pCi/L (or 2 pCi/L for added protection), add a fan. Conversion is straightforward and cost-effective.
The ROI Case
According to a December 2025 EPA cost-benefit analysis, radon mitigation returns up to $15 for every $1 invested, accounting for healthcare costs avoided through reduced lung cancer risk. Combined with the real estate value a working system adds to your home, active mitigation pays for itself many times over. For South Central Wisconsin homeowners, where baseline radon levels rank among the highest in the country, the return on investment is even stronger.
Radon Mitigation System Diagram: How Components Connect
Follow the path soil gas takes from beneath your foundation to open air. Each component connects in a specific sequence from bottom to top.
Bottom to Top: The Complete Path
The system starts at the suction pit beneath your slab, where soil gas collects under negative pressure. PVC pipe penetrates the slab through the cored hole, sealed at the slab penetration with polyurethane caulk. The pipe runs vertically through the home, connecting to the radon fan in unconditioned space (attic, garage, or exterior). Above the fan, the pipe continues upward to the discharge point above the roofline, where soil gas exits and disperses.
A U-tube manometer mounts on the pipe at a visible location, typically in the basement near the slab penetration. This gives you an at-a-glance confirmation that the system is working every time you walk by.
Interior vs. Exterior Routing
Aesthetics: Pipe hidden in closets or wall chases | Pipe visible on exterior wall
Freeze protection: Not needed | Required in Wisconsin
Installation ease: May require multiple floor penetrations | Single foundation penetration
Noise: Fan noise in attic (less noticeable) | Fan noise on exterior wall
Pipe longevity: Protected from UV and weather | Exposed to elements
Wisconsin-Specific Design Considerations
Exterior pipes in Wisconsin need insulation to prevent condensation from freezing inside the pipe during winter. Frozen condensation can block airflow and temporarily disable the system. Pipe insulation sleeves and proper slope (allowing condensation to drain back toward the suction pit) address this effectively.
All pipe runs must slope back toward the suction pit at a minimum grade so condensation drains downward rather than pooling. Install firestop collars wherever the pipe penetrates a fire-rated assembly. Electrical connections for the fan need to be accessible for maintenance but protected from moisture.
What to Expect During Radon Mitigation Installation
Most radon mitigation system installations wrap up in less than a day. Expect a process closer to a half-day plumber visit than a renovation project. Here is the full timeline from diagnostic testing through verification.
Pre-Installation: Diagnostic Testing
Before any drilling happens, a thorough installer can perform PFE diagnostic testing. This involves drilling small test holes (about 3/8 inch) at strategic points across your slab and measuring sub-slab pressure communication. The process takes 1 to 2 hours and determines suction point placement, fan sizing, and overall system design. This step separates a system engineered for your home from a generic installation.
Installation Day
A typical residential installation takes 4 to 6 hours. The sequence follows a logical order:
Core drilling through the concrete slab (4-5 inch hole)
Suction pit excavation beneath the slab
PVC pipe routing from the pit to the fan location
Fan installation in unconditioned space
Sealing all penetrations and accessible cracks
System activation and initial pressure verification
Core drilling is the loudest part of the process, lasting about 15 to 20 minutes. Beyond that, the noise level is moderate, similar to general handyman work. You can stay in your home during installation, though you may want to plan activities away from the immediate work area. Most homeowners carry on with their normal routine in other parts of the house.
Post-Installation: Verification
Once you activate the system, place a radon test 24 to 48 hours later for an initial confirmation reading. A follow-up long-term test (90 days or more) at 3 to 12 months provides a more accurate picture of year-round performance.
The results we've documented tell the story: homes dropping from 75 to 0.7 pCi/L, from 18.3 to less than 0.3 pCi/L, and from 14 to 0.08 pCi/L. A properly designed and installed radon mitigation system delivers dramatic reductions. Learn more about our installation process.
Radon Mitigation Cost: What You'll Actually Pay
Radon mitigation is one of the most cost-effective home health improvements available. According to the EPA's Consumer's Guide to Radon Reduction, installation ranges from $800 to $2,500 nationally, with most homeowners paying $1,000 to $2,000. Here is a transparent breakdown so you can budget with confidence.
Installation Cost
The Wisconsin Department of Health Services confirms that $1,000 to $2,000 range for standard basement installations in our state. Crawlspace systems run higher, typically $2,500 to $5,000, due to the membrane sealing and additional labor involved.
Factors that affect price include foundation type, number of suction points needed, pipe routing complexity, and whether the home has an existing passive system that just needs a fan.
Annual Operating Costs
The fan runs continuously, adding $60 to $123 per year to your electricity bill depending on the fan model. In cold climates like Wisconsin, the system also exhausts a small amount of conditioned air from beneath the slab, increasing your heating bill by an estimated $225 to $500 per year. A properly designed system minimizes this by using the right fan size for the conditions.
Long-Term Costs
Over the life of the system, budget for these expenses:
Fan replacement: $400 to $500 every 7 to 10 years
PVC piping: 50+ year lifespan, essentially permanent
Re-testing: $10 to $30 for DIY kits, $150 to $300 for professional testing
10-Year Cost Example
A realistic 10-year total: $1,600 installation + $900 electricity + $3,500 HVAC impact + $450 fan replacement = approximately $6,350. That works out to about $53 per month for continuous radon protection.
According to a December 2025 EPA cost-benefit analysis, radon mitigation returns $15 for every $1 invested. When you factor in reduced lung cancer risk and the value a working radon mitigation system adds during resale, the math favors action. A functioning system is a selling point for buyers, not a liability. For a detailed cost analysis, contact us or schedule a mitigation assessment.
Maintaining and Monitoring Your Radon Mitigation System
A radon mitigation system requires minimal attention. A few quick checks keep it running reliably for years.

Monthly Check (30 Seconds)
Glance at the U-tube manometer on the pipe in your basement. The fluid levels will be uneven, with the ideal reading between 0.5 and 1.75 inches of water column difference. This confirms the fan is creating suction. If both sides read zero, the fan has stopped working and needs inspection or replacement.
Annual Routine
Once a year, take five minutes to check three things:
Listen to the fan for unusual sounds (grinding, rattling, or silence)
Visually inspect visible pipe sections for cracks or disconnections
Check the discharge point for debris, bird nests, or ice buildup
In Wisconsin, ice can occasionally form at the discharge point during extreme cold snaps. If you notice reduced manometer readings during winter, check the discharge for blockage.
Re-Testing Schedule
The EPA recommends re-testing your home for radon every 2 years, even with an operating system. Also re-test after any significant home renovations, HVAC system changes, or foundation work. These changes can alter pressure dynamics and affect system performance. DIY test kits are available for $10 to $30 through the Wisconsin DHS or online retailers, or you can contact us for a continuous 48 hour or more test (recurring annual plans available). View our comprehensive radon testing guide here.
Fan Replacement
Radon fans last 7 to 10 years on average. Signs of a failing fan include increased noise, vibration, and a dropping manometer reading. Replacement costs $400 to $500 including labor.
Never turn the system off seasonally or during vacations. Radon accumulates continuously in the soil, and even a few days without the system allows levels to climb back toward pre-mitigation concentrations. The fan produces 50 to 75 dB at the unit itself (similar to a refrigerator), and since it's installed in unconditioned or external space, most homeowners don't hear it from living areas.
Radon Mitigation in Wisconsin: What Local Homeowners Should Know
South Central Wisconsin's geology makes radon a local issue that demands local expertise. Our glacial soils and limestone bedrock create ideal conditions for radon accumulation.
"Wisconsin's statewide average indoor radon level of 5.7 pCi/L is four times the national average of 1.3 pCi/L. Every one of the state's 72 counties falls into EPA Zone 1 (highest potential) or Zone 2 (moderate potential)." -- EPA Map of Radon Zones / Wisconsin Department of Health Services
Dane County falls in Zone 1, where approximately 50% of homes test above the EPA action level. If you live in South Central Wisconsin, testing is essential.
Winter Installations
Some homeowners assume radon mitigation can't happen in winter. It absolutely can. Radon levels tend to be highest during cold months due to increased stack effect and closed windows, making winter the season you most need the system running.
Exterior pipe routing requires insulation and proper freeze protection, which any experienced Wisconsin installer accounts for in the design.
Building Codes and New Construction
Wisconsin building codes include radon-ready requirements for new construction. These provisions typically include a gravel layer beneath the slab, a sealed vapor barrier, and a vertical PVC pipe from beneath the slab to the attic. This passive infrastructure makes future active system conversion simple and affordable if post-construction testing reveals elevated levels.
Local Resources
The Wisconsin Department of Health Services radon program offers free test kits to residents and maintains a list of certified mitigation professionals. In cold climate zones like ours, budget an additional $225 to $500 per year for HVAC impact beyond the standard $1,000 to $2,000 installation cost.
Real Estate Considerations
Wisconsin law requires sellers to disclose known radon test results to buyers. A home with an installed, verified radon mitigation system is a selling point, not a liability. Buyers view it as a proactive investment in the home's safety, and it removes a common negotiation hurdle during transactions.
FAQ
How long does a radon mitigation system last?
The PVC piping lasts 50 years or more. The radon fan is the only wear component, typically lasting 5 to 10 years before replacement at $400 to $500 including labor. The overall system infrastructure is essentially permanent.
Can I install a radon mitigation system myself?
Yes, though you'll need some specialized tools for proper workmanship and measurement. Professional installation is strongly recommended. Effective design requires PFE diagnostic testing, proper fan selection, and correct discharge point placement. Without these steps, DIY systems have significantly higher failure rates. Professional installation at $1,000 to $2,000 includes the diagnostics that determine whether the system works.
Does a radon mitigation system affect home value?
Yes, positively. A verified, operating system removes a common buyer concern and eliminates a negotiation point during home sales. In Wisconsin, where sellers must disclose known radon results, having a system in place streamlines the transaction.
How loud is a radon mitigation system?
The fan produces 50 to 75 dB at the unit, comparable to a refrigerator. Because it sits in unconditioned space (attic, garage, or exterior), most homeowners don't notice the sound from living areas. Vibration-isolating couplers further reduce noise transfer through the piping.
Do radon mitigation systems work in winter?
Yes. Winter conditions increase the stack effect that drives radon entry, but they also enhance the system's ability to create negative pressure beneath the slab. Exterior pipes can freeze in Wisconsin, but a properly designed system performs reliably year-round.
How often should I test for radon after installing a mitigation system?
Test 24 to 48 hours after activation for initial confirmation. Follow up with a long-term test (90+ days) within 3 to 12 months. After that, re-test every 2 years per EPA recommendations and after any renovations, HVAC changes, or foundation work.
Ready to address radon in your home? Learn more about our radon mitigation systems and schedule your consultation.